I am sure you already have heard about this toonify model, which converts any human face into a cartoon character. It’s kind of cool right!. Have you tried this or want to? So, Today in this blog I am going to show you how you can make your own cartoon character from your pictures.
What is Toonify and how it works?
Before using toonify, let’s understand what it is and how it works. Toonify is created using GAN (generative adversarial network) and CNN (convolutional neural network) which are the most popular libraries used in Deep Learning. And they fine-tuned this with a pre-trained model called ‘StyleGan’ which is trained on many people’s faces ( and can generate people faces which never existed in this world). Toonify is trained on only ~300 animated Images and still can output awesome results.

But the model had still some problems, the low-resolution layers affect the pose of the head and shape of the face, while the high-resolution layers control things like lighting and texture. So, they used a technique called layer swapping where they used the high-resolution layer from the original image and the low-resolution layer from his fine-tuned cartoon model.
Let’s create our own toonify!
Here is the link to my colab notebook 😃
Okay, let’s see how we can code this. So, I will be using google colab since it provides free GPU and we need that. First, we have to import TensorFlow version 1 as it is trained on this and may not work on other versions.
Read more –> What is GPU and how it is different from CPU?
%tensorflow_version 1.x
Now we will clone a repository of Stylegan2,
!git clone https://github.com/justinpinkney/stylegan2
%cd stylegan2
!nvcc test_nvcc.cu -o test_nvcc -run
Inside the stylegan2 folder, we will be creating 3 folders raw (where our raw image will be stored), aligned (here our image be aligned means it will correct the position of the face), and the last folder is called generated (here our final output will be stored).
!mkdir raw
!mkdir aligned
!mkdir generated
After setting this all up, now we will proceed to upload our Images in raw folder
%cd /content/stylegan2/raw/
Upload your image by clicking on the upload button,
from google.colab import files
uploaded = files.upload()
%cd /content/stylegan2/
After doing this we will import pre-trained model from their google drive
import pretrained_networks

# use my copy of the blended model to save Doron's download bandwidth
# get the original here https://mega.nz/folder/OtllzJwa#C947mCCdEfMCRTWnDcs4qw
blended_url = "https://drive.google.com/uc?id=1H73TfV5gQ9ot7slSed_l-lim9X7pMRiU"
ffhq_url = "http://d36zk2xti64re0.cloudfront.net/stylegan2/networks/stylegan2-ffhq-config-f.pkl"

_, _, Gs_blended = pretrained_networks.load_networks(blended_url)
_, _, Gs = pretrained_networks.load_networks(ffhq_url)
The next step is to correct face position
!python align_images.py raw aligned
After that we will generate latent vector of each aligned images with 1000 ( or you can increase or decrease it) steps. It will take pretty good amount of time depending on the step count, and numbers of images. Higher numbers of steps can give good output in cost of high computation power and time.
!python project_images.py --num-steps 1000 aligned generated
Here we will use those latent vectors to generate toonifed version of that image
import numpy as np
from PIL import Image
import dnnlib
import dnnlib.tflib as tflib
from pathlib import Path

latent_dir = Path("generated")
latents = latent_dir.glob("*.npy")
for latent_file in latents:
  latent = np.load(latent_file)
  latent = np.expand_dims(latent,axis=0)
  synthesis_kwargs = dict(output_transform=dict(func=tflib.convert_images_to_uint8, nchw_to_nhwc=False), minibatch_size=8)
  images = Gs_blended.components.synthesis.run(latent, randomize_noise=False, **synthesis_kwargs)
  Image.fromarray(images.transpose((0,2,3,1))[0], 'RGB').save(latent_file.parent / (f"{latent_file.stem}-toon.jpg"))
Now, this lead to our final steps to generate our output. But their one thing you need to take care about, on the last line display_image(str()) inside the str( ) you have to pass the exact same name of your image for example if you image name is ‘myprofile.jpg’ then inside the str() you will pass ‘myprofile’.
Note: if you haven’t uploaded any image then you may see an error or no output so, pls upload any image to see their result.
from IPython.display import Image
def display_image(img):
    embedded = Image(filename="generated/"+img+"_01.png", width=256)
    display(embedded)
    tooned = Image(filename="generated/"+img+"_01-toon.jpg", width=256)
    display(tooned)
display_image(str(1))
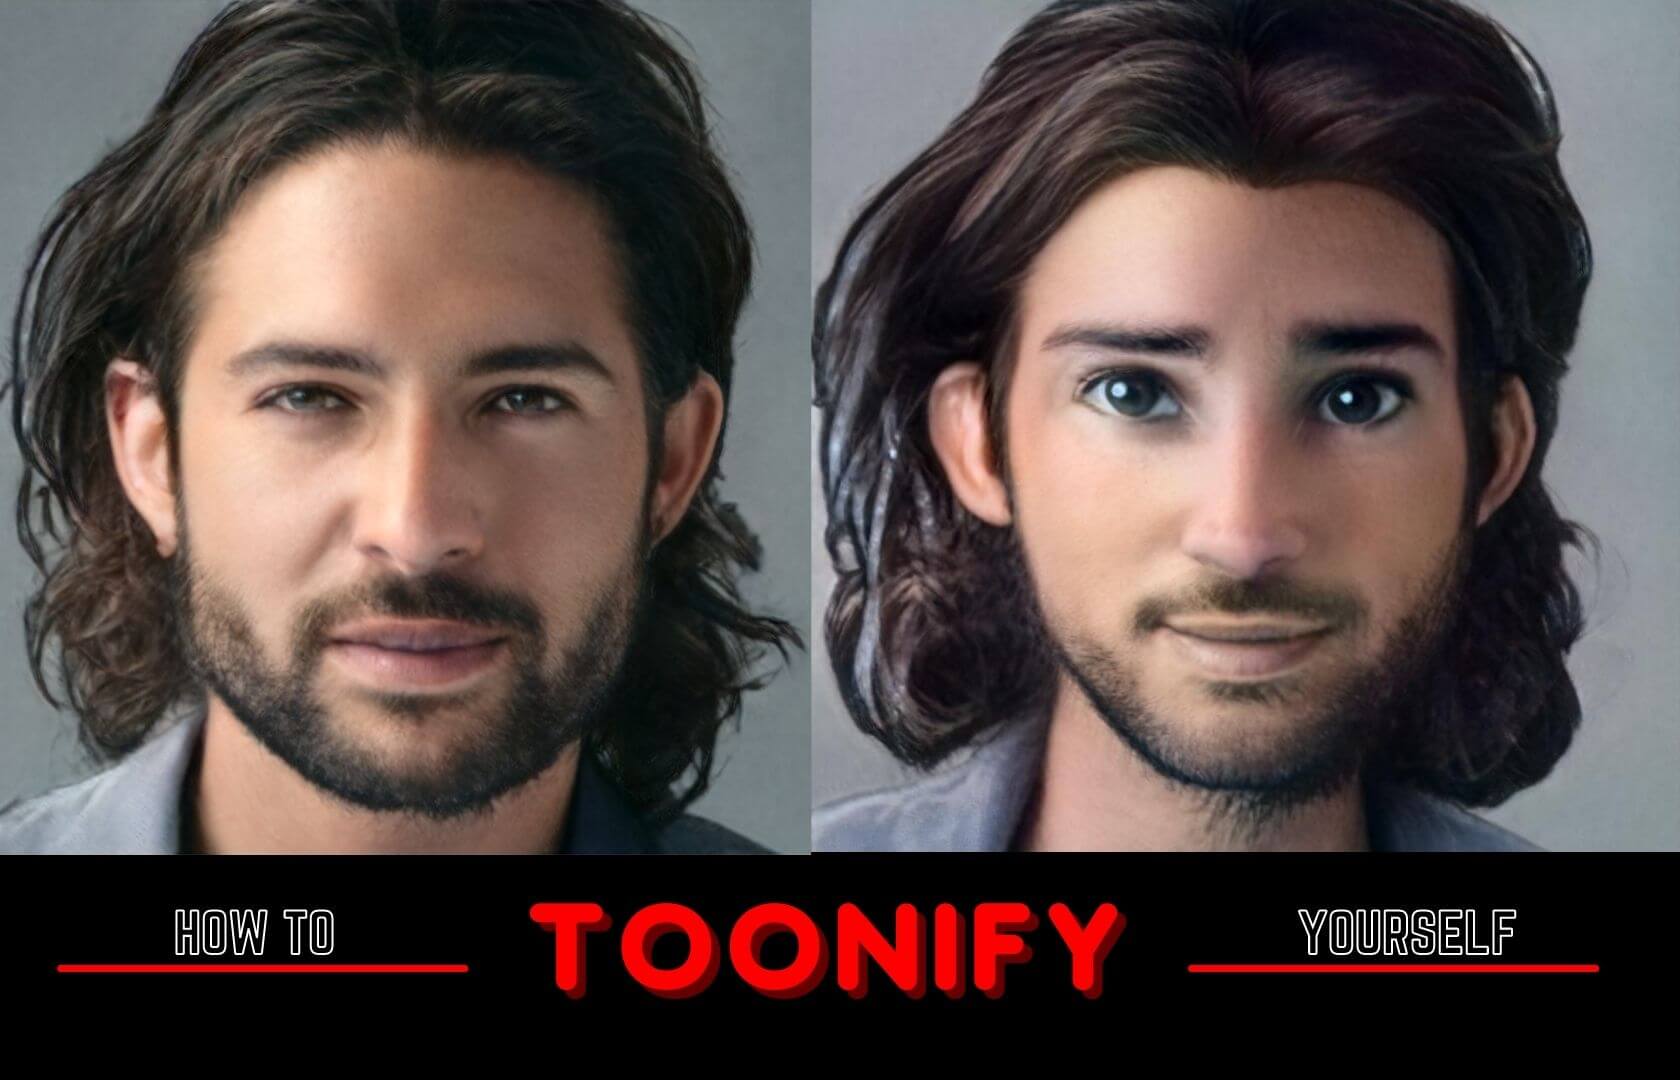
And here is our final output 😍

Data Scientist with 3+ years of experience in building data-intensive applications in diverse industries. Proficient in predictive modeling, computer vision, natural language processing, data visualization etc. Aside from being a data scientist, I am also a blogger and photographer.