Introduction
So, today we are going to see another cool project. In this article I am going to show you how you can do sentiment analysis with Twitter’s data. If you are unaware of sentiment analysis then here’s the thing, sentiment analysis is analysis of an emotion of joy, happiness, anger, etc from a document, phrase or a sentence.
So, why do we do sentiment analysis, it is because suppose you are selling something online and you got lots of comments and reviews. So in order to understand your customer that they are happy with your product or not you will need to read them. But reading all those comments and reviews will not be that easy so to solve this kind of problem we use sentiment analysis which will read all those comments and return the sentiment of Positive, negative and neutral.
It’s not used for that only there are several other use cases as well like social media monitoring, customer support analysis, market research, etc. For example, Facebook and other social media use it for removing hate speech from their platform,
Read more –> Learn more about Natural language Processing
Requirement
Alright, I hope you get the idea. So, let’s talk about the requirement for Twitter sentiment analysis. For twitter sentiment analysis you obviously will need to have a Twitter account along with that, you will need to create a Twitter API which will let you extract tweets from Twitter.
Steps to create Twitter API
- Go to the Twitter Developer page from here
- Click on create an app button
- Choose an option between Professional, Hobbyist, Academic.
Personally, I chose the Academic>Student option and I will recommend you too if you don’t know much about it. - After that fill the form, answer everything accordingly. And after review, they will approve your account.
In my case it took me 2 days to get approved, they ask a lot of questions and even after answering all questions in the form they asked a few more questions (don’t know if that goes with everyone or it was just me.) - After your account gets approved, you will sign back to your account on the same website, and then you will have to create one project and app, just fill in the details any random names, etc will be fine.
- Then head to your created app there you will find a key and tokens option, just click on that and copy all your credentials. That’s it
Twitter Sentiment Analysis
I did this on Google colab and for your ease I am attaching my notebook file. Let’s start by importing all the required library, we will using in our analysis
- Re → for cleaning our tweets
- NLTK → for removing stop words
- Numpy → for processing image
- Pandas → for handling extracted data
- Textblob → for sentiment analysis
- Wordcloud → for plotting word cloud
- Tweepy → for Twitter API authorization and extracting tweets from it
- Matplotlib → And the last one is matplotlib, we will be using this for some visualization.
Also, read –> How to toonify your image with python
# Importing all required library
import re
import nltk
import tweepy
import numpy as np
import pandas as pd
from textblob import TextBlob
import matplotlib.pyplot as plt
from wordcloud import WordCloud
Next we will enter our API key and tokes to authenticate our Twitter API with tweepy. Here I have stored my tokens in a csv file so, I am reading it with that, but you can directly enter your token to the variables in string format
# Load the file
from google.colab import files
uploaded = files.upload()

# retrive data
login = pd.read_csv('Twitter API.csv')

# Twitter Api Credentials
consumerKey = login.Consumer_Key[0]
consumerSecret = login.Consumer_Secret[0]
accessToken = login.Acess_Token[0]
accessTokenSecret = login.Acess_Secret[0]
# athuenticate with twitter
auth = tweepy.OAuthHandler(consumerKey, consumerSecret)
auth.set_access_token(accessToken, accessTokenSecret)

# create API object
api = tweepy.API(auth, wait_on_rate_limit=True)
Now we will extract tweets from Twitter. You can extract tweets of any Twitter user or you can also extract of any keyword or hashtags. I have written the code for both and you can try different methods by just commenting in and out two lines. But here I am extracting Elon’s tweet, you can choose someone else’s Twitter handle too.
# let's access the tweets

# # By Hashtags or Keywords (uncomment this below 3 line to extract tweets with hashtags)
# search_t = '#ArtificialIntelligence -filter:retweets'
# posts = tweepy.Cursor(api.search, q=search_t, lang='en', since='2018-1-1', tweet_mode='extended').items(2000)

# By user
search_t = 'ElonMusk'
posts = api.user_timeline(screen_name= search_t, count=200, lang='en', tweet_mode = 'extended')

# let's store those tweets in a dataframe
all_tweets = [tweet.full_text for tweet in posts]
df = pd.DataFrame(all_tweets, columns=['Tweets'])
# let's see how many tweets do we got
df.shape

# output
(200,1)
# let's have a look at some tweets
pd.set_option("display.max_colwidth", -1) # allows us to see the full text
df.sample(10)

We will need to remove unwanted elements from tweets for example URL, hashtag, mention, etc are not important for sentiment analysis. So, we will be using regex to match the pattern and remove the waste element
# we need to remove a lot of junk(urls, tags, RT, Hashtags) from the tweets
# so we will use regular exlpression for that
def clean_tweets(tweets):
  tweets = re.sub('@[A-Za-z0–9]+', '', tweets) #Removing tag(@)
  tweets = re.sub('#', '', tweets) # Removing hashtag(#)
  tweets = re.sub('RT[\s]+', '', tweets) # Removing RT
  tweets = re.sub('https?:\/\/\S+', '', tweets) # Removing links
  return tweets

df.Tweets = df.Tweets.apply(clean_tweets)
# let's see if it cleaned everything or not
pd.set_option("display.max_colwidth", -1) # allows us to see the full text
df.sample(10)

Now we will calculate the subjectivity and polarity of tweets. If you don’t know subjectivity is nothing but a sentence that expresses some personal feelings, views, or beliefs. Its values range from 0 to 1 where 0 is very objective and 1 is very subjective
while polarity simply means emotions expressed in a sentence. Its value ranges from -1 to 1, where -1 represents the most negative comment and 1 represent the most positive comment
# let's calculate subjectivity and Polarity
# function for subjectivity
def calc_subj(tweet):
    return TextBlob(tweet).sentiment.subjectivity

# function for Polarity
def calc_pola(tweet):
    return TextBlob(tweet).sentiment.polarity

df['Subjectivity'] = df.Tweets.apply(calc_subj)
df['Polarity'] = df.Tweets.apply(calc_pola)
# let's have quick look to our dataset
df.head(10)

Now we will classify each tweets into different sentiment class which are Positive, Negative and Neutral. So, let’s see how it goes.
# now let's classify these tweets based on their sentiment(polarity)
def sentiment(polarity):
    result = ''
    if polarity > 0:
        result = 'Positive'
    elif polarity == 0:
        result = 'Netural'
    else:
        result = 'Negative'
    return result

df['Sentiment'] = df.Polarity.apply(sentiment)
df.head()

Okay so, now that we have classified the tweets, let’s see the result with visualization
# let's see how many ratio of sentiment
df.Sentiment.value_counts().plot(kind='bar', color='red')
plt.title('Sentiment Classification')
plt.show()

plt.scatter(df.Polarity, df.Subjectivity, color='red')
plt.title('Sentiment Analysis')
plt.xlabel('Polarity')
plt.ylabel('Subjectivity')

You can see in the graph most of the tweets is on the right side (positive tweets) and on the middle (neutral tweets).
# let's see the percentage of different sentiment's class

# Creat
Df_sentiment = pd.DataFrame(df.Sentiment.value_counts(normalize=True)*100)

# calculating percentage
Df_sentiment['Total'] = df.Sentiment.value_counts()
Df_sentiment

# Alright, let's see which word is used most by Elon

# setting up stop words
nltk.download('stopwords')  # run this if you get any error
stpwrd = set(nltk.corpus.stopwords.words('english'))

# Combining all tweets text
allWords = ' '.join([twts for twts in df['Tweets']])

# Image we will use for Word's cloud mask
from google.colab import files
uploaded = files.upload()

# by default files are uploaded in /content folder
import cv2
image = cv2.imread('/content/'+next(iter(uploaded)))
Elon = image

# word cloud
def Word_cloud(data, title, mask=None):
    Cloud = WordCloud(scale=3,
                      random_state=21,
                      colormap='autumn',
                      mask=mask,
                      stopwords=stpwrd,
                      collocations=True,).generate(data)
    plt.figure(figsize=(20,12))
    Cloud.to_file(str(title)+'.png')  #uncomment this if you want to download it
    plt.imshow(Cloud)
    plt.axis('off')
    plt.title(title)
    plt.show()

# plot it
Word_cloud(allWords, 'Elon Musk', mask=Elon)
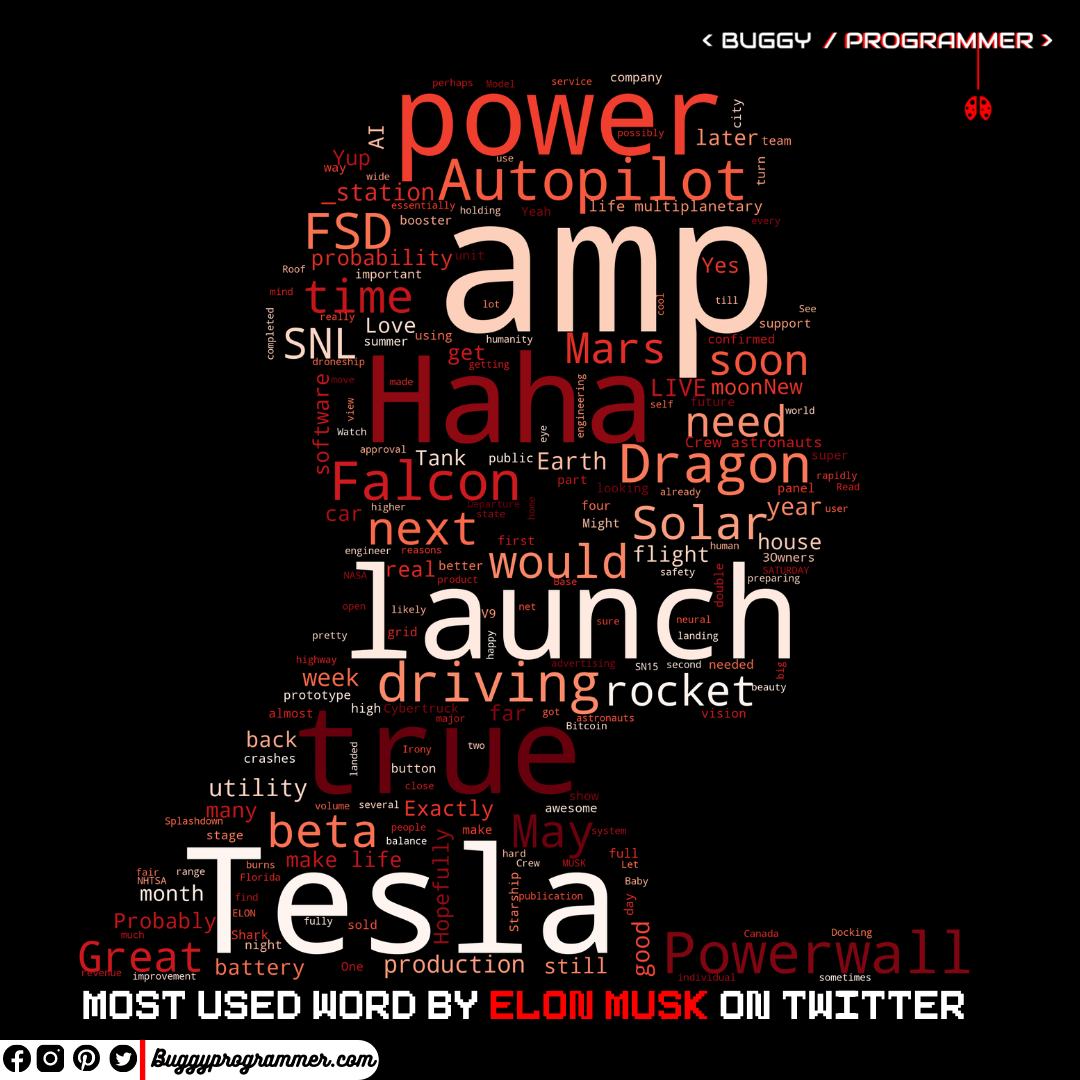
Now, the most exciting part, Let’s see which words are most used by Elon Musk. Generally, it will output the image in a regular rectangle shape but here I am using an image (image of a person) as a mask, so it is changing its shape.
Also read –> How to bring your old photo back to life with python
The image I am using for the mask can be found here

Data Scientist with 3+ years of experience in building data-intensive applications in diverse industries. Proficient in predictive modeling, computer vision, natural language processing, data visualization etc. Aside from being a data scientist, I am also a blogger and photographer.
- Aman Kumar
- Aman Kumar
- Aman Kumar
- Aman Kumar
- Aman Kumar
- Aman Kumar
- Aman Kumar
- Aman Kumar
- Aman Kumar
- Aman Kumar
- Aman Kumar
- Aman Kumar
- Aman Kumar

